Classic Crochet Tote Bag Pattern
An everyday tote in single crochet with a rectangular base, straight sides and two shoulder handles crocheted on in the final rounds.

Tutorial at a glance
Materials
- Worsted (#4) cotton yarn, about 320 yd (293 m)
- US 7 (4.5 mm) crochet hook
- 6 locking stitch markers
- Yarn needle
- Scissors and tape measure
A good everyday tote has three things: a flat base so it stands up, straight sides in a fabric dense enough to hold its shape, and handles long enough to go over a shoulder. This pattern delivers all three with one stitch, single crochet (sc), worked in the round from the bottom up. The handles are crocheted on, so nothing is sewn.
Materials and gauge
- Worsted (#4) cotton yarn, about 320 yd (293 m)
- US 7 (4.5 mm) crochet hook
- 6 locking stitch markers (4 for the corners, 1 for the start of the round, 1 spare)
- Yarn needle, scissors, tape measure
Gauge: 14 sc and 16 rounds = 4 in (10 cm). That is noticeably tighter than a worsted yarn label recommends, and it should be: a tote carries weight, and loose single crochet stretches. If your swatch is wider than 4 in (10 cm), drop to a US G-6 (4 mm) hook.
Finished size: about 11 in wide, 3 in deep and 12 in tall (28 x 8 x 30 cm), with a handle drop of roughly 9 in (23 cm). To plan a different size, use the numbers in the crochet tote bag size guide.
Notes before you start
- The tote is worked in a continuous spiral: no joining and no turning chain. Mark the first stitch of each round and move the marker up.
- A corner is 3 sc worked into one stitch. It adds 2 stitches, so four corners add 8 stitches per round.
- Abbreviations: chain (ch), single crochet (sc), slip stitch (sl st), stitch (st).
The rectangular base
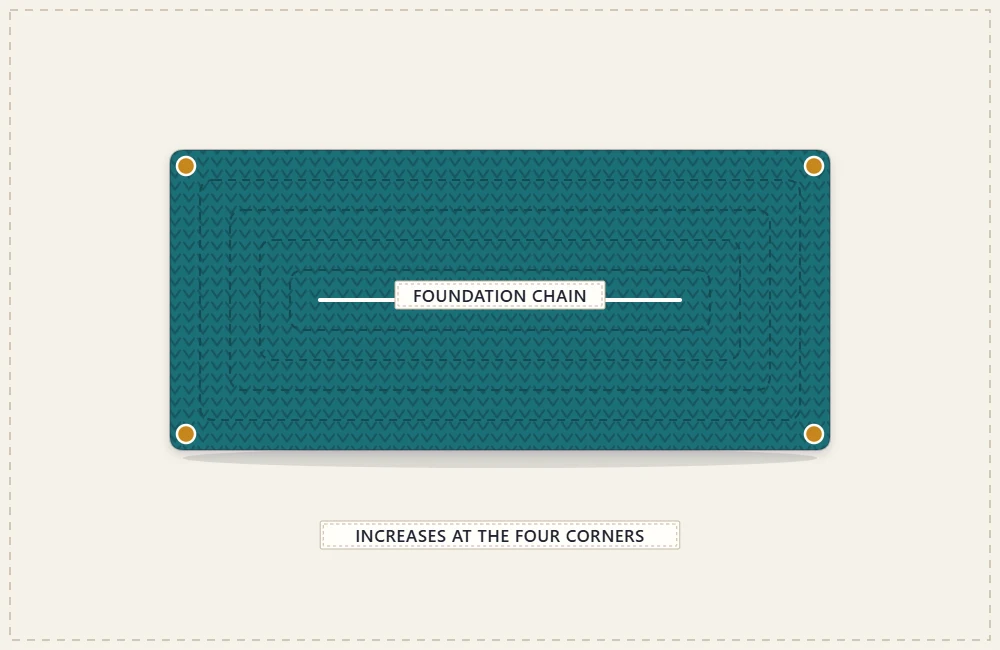
- Foundation: Ch 31.
- Rnd 1: Sc in the 2nd ch from the hook and in each of the next 28 ch, 3 sc in the last ch. Rotate to work along the other side of the chain: sc in each of the next 28 ch, 2 sc in the last ch (the one that already holds the first sc). (62 sc)
- Rnd 2: 3 sc in the first st, sc in the next 28 sts, 3 sc in the next st, sc in the next st, 3 sc in the next st, sc in the next 28 sts, 3 sc in the next st, sc in the last st. (70 sc)
Place a corner marker in the middle sc of each of the four 3-sc groups. From here on, every round follows one rule: sc in each stitch, and work 3 sc in each marked stitch, moving the marker to the middle sc of the new group. Written out in full:
- Rnd 3: Sc in the first st, 3 sc in the next st, sc in the next 30 sts, 3 sc in the next st, sc in the next 3 sts, 3 sc in the next st, sc in the next 30 sts, 3 sc in the next st, sc in the last 2 sts. (78 sc)
- Rnd 4: Sc in the first 2 sts, 3 sc in the next st, sc in the next 32 sts, 3 sc in the next st, sc in the next 5 sts, 3 sc in the next st, sc in the next 32 sts, 3 sc in the next st, sc in the last 3 sts. (86 sc)
- Rnd 5: Sc in the first 3 sts, 3 sc in the next st, sc in the next 34 sts, 3 sc in the next st, sc in the next 7 sts, 3 sc in the next st, sc in the next 34 sts, 3 sc in the next st, sc in the last 4 sts. (94 sc)
- Rnd 6: Sc in the first 4 sts, 3 sc in the next st, sc in the next 36 sts, 3 sc in the next st, sc in the next 9 sts, 3 sc in the next st, sc in the next 36 sts, 3 sc in the next st, sc in the last 5 sts. (102 sc)
The base now measures about 11 x 3 in (28 x 8 cm) and should lie flat with square corners. Remove the four corner markers.
The sides
- Rnd 7: Working in the back loop only, sc in each st around. (102 sc)
- Rnd 8: Working through both loops, sc in each st around. (102 sc)
The back-loop round creates the sharp turn from base to sides. Repeat Rnd 8 until the sides measure 11 in (28 cm) from that turn, about 44 rounds at this gauge. The count stays at 102 throughout.
If you plan to add a stiff insert to the base, cut it to the base measurement before the sides get tall; the method is in the guide on how to reinforce a crochet bag.
The handles
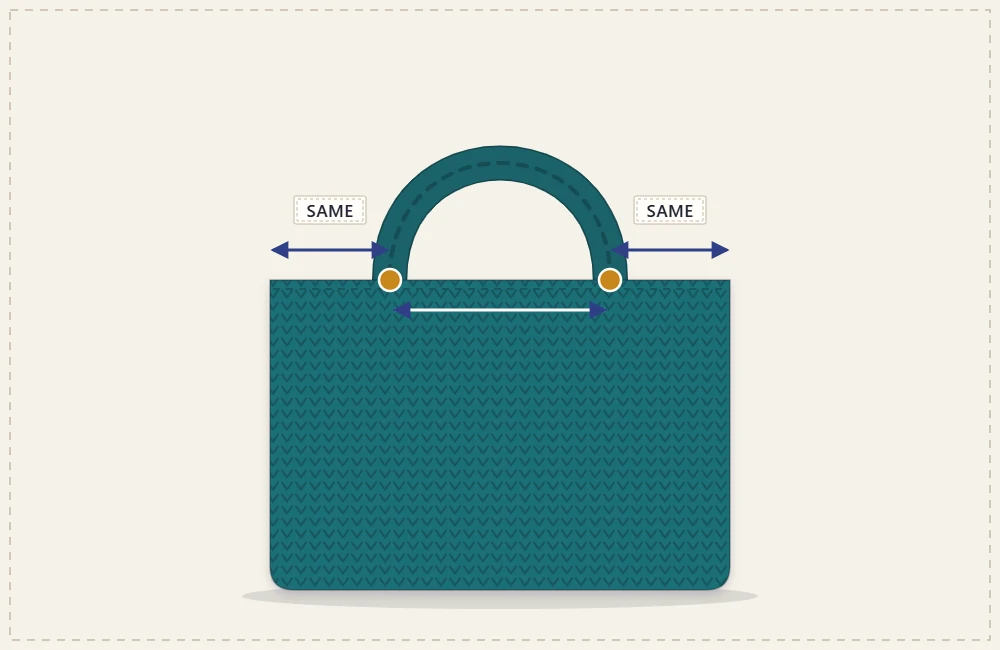
Spiral rounds lean a little, so place the handles by the shape of the bag rather than by the start of the round.
- Flatten the tote so each short end of the base is creased down its center and the two long sides lie on top of each other.
- Put a marker in the top-edge stitch at each side fold. Count the stitches between the markers: each face should have 51, counting one marked stitch per face. Shift a marker by a stitch if needed.
- Sc in each st until you reach the first marker. That marked stitch is now the first stitch of the round.
- Handle Rnd 1: [Sc in the next 16 sts, ch 70, skip the next 19 sts, sc in the next 16 sts] 2 times. (64 sc and 2 ch-70 handles)
- Handle Rnd 2: Sc in each sc and in each ch around. (204 sc)
- Handle Rnds 3 and 4: Sc in each st around. (204 sc)
Finish: Sl st in each of the next 2 sts, fasten off and weave in the ends.
Make sure neither chain is twisted before you work into it. In Handle Rnd 2, insert the hook under the top loop and back bump of each chain, which leaves a neat single strand along the underside of the handle. The handles finish at about 1 in (2.5 cm) wide and 20 in (51 cm) long.
Watch out
Crocheted handles lengthen with use, more so under a heavy load. If you prefer a shorter drop, chain 60 instead of 70; Handle Rnds 2 to 4 will then total 184 sc.
Optional upgrades
- Firmer handles: work a round of sc along the underside of each handle and across the 19 skipped stitches, or use one of the other methods in the guide to crochet bag handles.
- A lining: a fabric lining stops pens and keys from poking through and takes strain off the stitches. See how to line a crochet bag.
- More height: keep repeating Rnd 8. Each extra inch (2.5 cm) takes 4 rounds and roughly 17 yd (16 m) of yarn.
Frequently asked questions
Why does my rectangular base have rounded corners?
Each corner needs 3 single crochet in one stitch on every base round. With only 2, the corners soften into curves and the base starts to cup instead of lying flat.
Can I use this pattern with thicker yarn?
Yes, the stitch counts still work, but the tote will be larger and will need more yardage. Swatch first, then divide the stitch counts by your stitches per inch to estimate the new size.
How do I stop the handles from stretching?
Keep the gauge tight, work the extra rounds over the handle chain, and consider a round of single crochet along the underside. For heavy loads, a strip of ribbon or webbing sewn under the handle helps most.